Life Update! (Exciting News!)

news header

Hello gorgeous people!

Before I jump in and talk about myself, I’d like to know: How are you? How has your weekend been? 🙂 I hope you are enjoying your life to the fullest!

So as you can guess from the title and the header image, I have a pretty BIG news that I want to share with you guys! Before I reveal what it is, *wink, wink* I’d like to talk about why I have been absent from my blog for more than a week. People have been sending me messages on Twitter and on Instagram asking me where I am and why I haven’t been blogging for a while. If you read my June Favourites post, you’ll know the reason but I’d like to elaborate.

Blogging has been the best thing in my life so far but I needed to take a step back and look around myself. I have major exams coming up in December this year for which I need to prepare like as if I am preparing myself for a war. I was home schooled throughout my high school years so it is the same with my college. I am studying in correspondence and I do not have any teachers to guide or help me. Which is why it is very important for me to nail my first year exams. These results will decide what I get to do in future which is why I had to put my laptop down and just be with my books. In just a week, I completed more than half of my studies.

I know I promised you guys 3 articles a week and I was posting them for a month but the books sitting idly around me brought me back to reality and I was so scared that I was not able to write a single post. I sat down to write but it was as if the books beside me were just looking at me with a disappointed stare. I know it sounds dramatic and it probably is, but it hit me really hard how much I had been neglecting my studies. If I screw up my studies, I don’t know if i’d be able to blog. I am NOT giving up blogging! No chance! It is the best thing ever and I have met some of the nicest people through S&S and I am so grateful to my readers who take time off their busy schedules to read and comment on my posts. Yeah, I am not giving up blogging. I apologize to everyone who thought I had but that is not the case, at all!

I am getting back in blogging seeing how great my studies went these last few weeks, it honestly did! I feel a lot confident now and I am sure I will excel. I literally sat in my room for hours devouring book after book. I am currently in the middle of making notes and filling out assignments. The exams are in December and I am confident they’ll go nicely if I keep up the way that I have been studying for a few more months.

Now let me tell you my news!! *Sheepish Grin*

I am shifting my blog to a self hosted site!! *Scream!*

I know you must be thinking, “WHAT?! NOW?! You just said that you want to focus on studies! You said long ago that you wont shift to self hosted until you were done with your exams!”

I know, I know! I was not planning on doing it but seeing where I am now, with my progress and everything, it just feels right! I will admit that I wasn’t going to shift it before next year but I was contacted by the amazing people from Blogerize and they wanted to design my blog’s layout. So we talked about how I wanted my design to be and they presented me with the design of my dreams! To activate that, my blog needs to be on a self hosted platform. After I saw the design, (Which I can’t wait to show you guys!) I just knew that yeah, I need to move! That is the design my S&S NEEDS! When you know, you just know! So I am going to shift it by the end of this week, maybe sooner! I was going to shift it anyways and now seemed like a really good time. Gut feeling! I wouldn’t have gotten the feeling or the courage to move my blog if I hadn’t got the absolutely breath taking support and feedback from you guys!

I have made a timetable for myself where I can study and blog at the same time without feeling scared or guilty. Why didn’t I do that before? Let’s just say that my brain was asleep! This brain is a super lazy one, my friends! I have some really good beauty, skincare and health posts ready for you guys! I am so excited! Follow me on Instagram and Twitter to see previews of what is coming up!

I am so excited for this! I don’t think I will be be able to post 3 days a week as I used to. I will be posting twice instead… Till my exams are done! I have some really good posts waiting to be published and I will publish them when I have moved! Hopefully by the end of this week, you’ll see the new and improved Styles and Sensibilities! 🙂

Goodness! I have been rambling on as usual! Thank you for your concern, I really appreciate it and all the amazing support I am getting! I can hardly wait for my new blog!

See you guys soon!! Don’t forget to follow me on Twitter and Instagram for previews of what is coming up! 🙂

sign

Makeup Revolution Iconic Dreams Palette Review

Hello everyone! How have you all been? 🙂

header

If you are a beginner in the makeup world and want to get your hands on nice big affordable eye shadow palettes, you should really consider trying out the Makeup Revolution collection. I think Makeup Revolution is an exceptional brand and they have so many palettes to choose from. The best part is, they are incredibly affordable. Considering the price and the quality you get, it is a real steal, my friends! In my humble opinion, I think Makeup Revolution make some of the best palettes in the drugstore/superdrug section.

IMG_3940-1

I got myself this palette which is called Iconic Dreams and you need this in your life amigos! To know more about this palette, please keep on reading! 🙂

PACKAGING: The eye shadows come in a black plastic rectangular box with a clear panel on top. The case is quite functional as it shuts tight, is compact and travel friendly. There is a dual end sponge applicator which I don’t generally use but they are excellent tools for patting on glitters or for mild blending. They have the ingredients list mentioned on the backside of the box in big clear, readable letters which I think is a big plus as most ingredient lists are small and sometimes unreadable.

IMG_3939-1

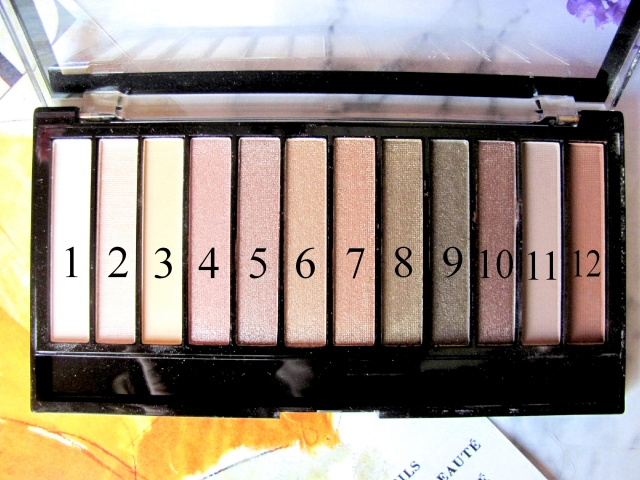
SHADES AND PIGMENTATION: I absolutely adore the shades in this palette. I am sure you all know by now that I steer towards warm, pastel and earthy tones and this palette is a great choice for everyday use. I like to use shimmery shades on my lids and pair them up with nice matte shades on the crease. This palette provides such a nice selection of shades. It starts with light, creamy shades and gradually shifts to darker more iconic shades. The colours are easy to blend and apply on the lid. They compliment each other and I can create several looks with them.

NUMBERS

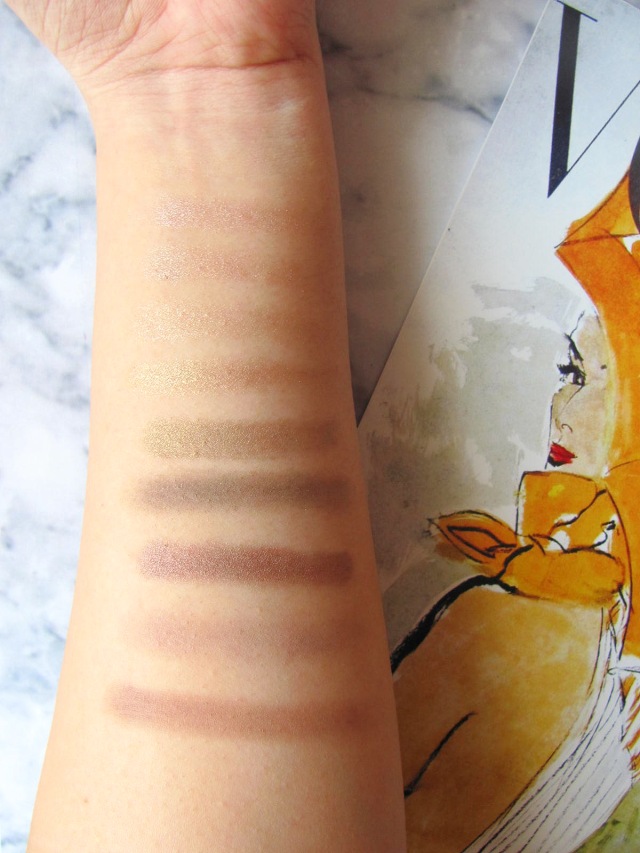
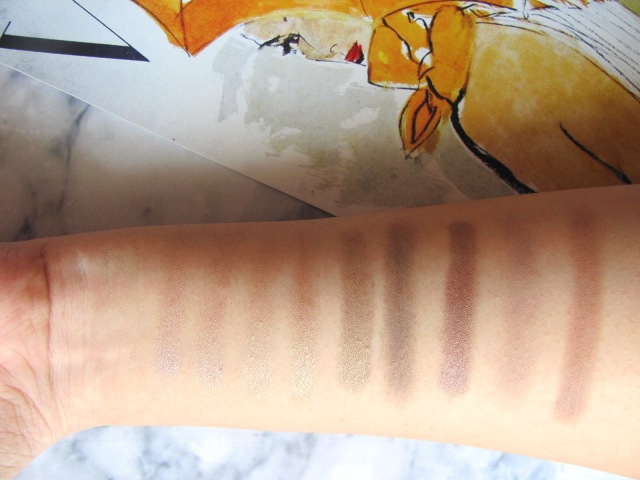
(Note: Sadly, the swatches on my hand look very faded. In real the colours have a lot of pigmentation but for some reason, my camera was unable to capture that)

Shade 1: It is a pretty creamy skin matte shade which is perfect for highlighting the brow bone and the inner corners. It has really nice pigmentation and gives the desired shade in one swipe.

Shade 2: It is a shimmery pink champagne shade which also works wonderfully as a highlighter. It has nice colour payoff and I feel like you can also use this as a highlighter for your cheek bones! Using eye shadow as a cheek highlight? Why not! 😉

Shade 3: It is a matte light yellow shade which can be used on lids and as a highlighter. It is not at all chalky and has good pigmentation.

IMG_3944-1

Shade 4 and Shade 5: These two shades are very similar to each other. They are both shimmery and pink but the 4th shade is a dusty pink shade (one of my favourite shades) and the 5th shade has gold undertone in it. Rose Gold is the best way to describe the 5th shade and rose gold is one of my favourite colours!

Shade 6: It is a gold shimmery shade and is very light. It is also the only shade in the palette with the least pigmentation.

Shade 7: It is a slightly metallic strong gold shade which is incredible. I personally love gold metallic shades and have many of them. I think this shade is suitable for day wear as it blends and diffuses. It is not very bright.

Shade 8: This shade is very unusual! It is an olive green with gold shimmer in it. I don’t usually like green but this shade changed my mind. I think this is a very unique shade and it is bound to look good on everyone!

Shade 9: I am a bit confused about this shade. First of all, this shade creates a lot of fall out and the shimmers fall or disappear. When I first swatched this, it came out in chunks and I thought it was a chunky green and gold glitter shadow but the moment I blended it, the glitters fell and left behind a black stain. I tried it on with fix plus still it didn’t stick which is a shame as I quite liked the mix of gold and green glitter.

Shade 10: This shade has to be my favourite shade in this palette. I never had this colour before and I feel madly in love with it the moment I swatched it. It is a beautiful shimmery and slightly metallic plum shade. The colour payoff is incredible and it looks amazing when patted onto the lid. I usually pair it with the 12th shade in the crease.

IMG_3955-1

Shade 11: It is a matte taupe lilac shade which is perfect for the crease and acts as a beautiful transition shade. It is not heavily pigmented which is why you have to work with it to get the colour of your choice.

Shade 12: This shade is also one of my favourites. It is a matte, woody and cinnamon shade which looks spectacular on the crease. It has really nice pigmentation which is why I use small amounts of it to build up the colour.

IMG_3956-1

If you want to get the Naked palettes or the Too Faced palettes but can’t, this brand has amazing dupes for them.

PRICES: £4, INR 700-800(Online and different prices on the original MUR website store) and $6

RATING:  RATING

Are you a Makeup Revolution fan? Let me know if you have use any of their products before! Hope this review was helpful! I’d love to know if you are planning on purchasing this palette! 🙂

And before you say goodbye to my blog today, don’t forget to follow me on my new Twitter and on my not so new Instagram!😀

Join my wonderful S&S family and I will see you guys soon!!

sign

HDF #2: Treat Oily Skin Naturally


For HEALTH DAY FRIDAY today I will be talking about how to tackle oily skin!

Oily skin can be majorly frustrating. Everyday I notice my face makeup and even my eye makeup melt down thanks to my oily skin. I did a lot of research on how to tackle this and even used a bunch of products but nothing seemed to work! In the end I found that natural way worked the best even if it took time, it worked.

There are several reasons that make your skin oily; stress, lifestyle, weather, genetics, menstrual cycles and even makeup! There are several things you can do to prevent it for a period of time during the day such as, using blotting paper, good makeup primers, setting powders & sprays. While trying out right products such as clay masks, face washes and cleanser at home. Believe me, I have been there and I have tried several clay masks and cleansers but those are just temporary. Your oily skin will return unless treated properly.

So you have tried several products from the market, right? Feel like trying a few products from your kitchen? 😉

NOTE: Always do a patch test first before applying the ingredients to your entire face.

Lemon Juice

Lemon juice helps dry out the excess oil from your skin and revitalizes and rejuvenates your skin.

lemons1

How to use it:

Mix equal parts water and fresh-squeezed lemon juice and apply it to your face. Once it’s completely dry, rinse it off with warm water, then cool water. Do this everyday, if possible right before showers.

Banana and Honey

Banana and honey help remove excess oil and soothe skin, leaving it brighter and much more hydrated.

MASK

How to use it:

Blend one peeled banana and 1 tablespoon honey together to make a smooth paste .Add a few drops lemon or orange juice to it as it helps dry excess oil and rejuvenate skin. Apply the paste to face and let dry for 15 minutes.Wash off with cool or steaming hot washcloth and then pat dry.

Salt

Salt works as a disinfectant and a natural drying agent, it is one of the most effective ways of remove excess oil.

with-a-glass-of-salt-water-to-better-and-improved-overall-health

How to use it:

Take a clear spray bottle and fill it up with tepid water (two parts cold water and one part boiling water) and add in a teaspoon of salt. Shake it well till the salt completely dissolves then spray the liquid directly on your face. (Keep your eyes closed) Do not rinse it out and do this regularly to get rid of oily skin.


Repeat daily to get rid of oil skin.

Orange Peel

Orange peel is one of my favourite ingredient to use as it contains astringents, which helps control oil secretion.

orange-peel

How to use it:

After eating an orange and taking in all it’s goodness in your body, layout the peels in the sun and let it dry. Then blend it to make a fine powder and mix it with rosewater or curd to make a paste. Apply to face and leave on 30 minutes. Rinse it off with water. Do this regularly to control oil and prevent blemishes.

Tomatoes

Tomato juice helps removes excess oil and tighten the pores.

tomato-juice-drink

How to use it:

Take a fresh tomato and blend it to make a juice. Taking a cotton ball dip it in the juice and apply it all over your face. Leave it on until it is completely dry, then rinse off with lukewarm water. Do this 1-2 times weekly for the best results. 🙂

Hope you guys found it useful and if any of you try these out, do let me know your experience with it down in the comments sections!

Don’t forget to follow/subscribe and join the S&S family!

You can also follow and stay in touch with me on my Twitter & Instagram!! Have you joined our Beauty Bloggers Corner yet? Find out about it HERE 🙂

PICTURE SOURCES: 1  2  3  4  5  6


HDF: #1 How To Get Rid Of Dark Circles Naturally!

Hi guys!

Welcome to Health Day Friday where I will be addressing lifestyle, skincare and health related issues we all face on a regular basis and how to overcome them naturally. I am a firm believer that skin can be healed naturally without the aid of packaged chemical products from the market. As much as I love makeup and beauty, I feel like when it comes to skin and health care, going natural is the best way which is why you will see that I have a small and carefully selected collection of serums & moisturizers from the market.  My mother and grandmother have been practicing natural remedies for several years now and they have introduced me to it. When I was kid, I hardly paid attention to what they used to say and never let them apply their gooey conjured up masks on my face. However as time passed and I joined middle then high school, I became more conscious about my appearance and tried my best to hide my pimples with my mother’s compact powders. When my brain finally understood what those conjured up natural products were, I was willing to try them. Little by little, I started exploring more into the natural skin care techniques. I learnt a lot from my mother, from magazines and of course good old internet. Since then, I can confidently say that my skin has improved A LOT! It is all thanks to the natural products.

So if you are like me, who is interested in natural health and skin care, and to those who are curious and new to it, welcome! Every Friday, I will be addressing common health and skin care Friday under my “Health Day Friday” section and I hope you all, my lovely readers, find it useful and try them out!

SMALL SIDE NOTE: If the ingredients listed below are new for your skin, I would highly recommend you doing a patch test first before applying it to the whole face as natural ingredients though effective, can be acidic in nature.

Common Causes of Dark Circles

Dark circles are a very common skin and health care issue right now. There are several reason why they are cause and once they appear, they can make your eyes and ultimately your face look dull, tired and can also make you look older.

Dark Circles

The most common causes of dark circles are:

  • Lack of sleep
  • Oversleeping
  • Age
  • Lifestyle
  • Skin pigmentation
  • Excess intake of sodium
  • Fluid retention
  • Extreme exposure to sun

These are some of the most common reasons why dark circles are formed. There are several products in the market which claim they can help you get rid of dark circles in a jiffy, though some might really be effective, most are not. Natural way of treating such issues take TIME, PATIENCE and CONSISTENCE.  Natural ways, though most effective, takes time and you have to be regular in your application and not give up. Sometimes natural remedies can give you overnight results but the rest takes time. These ingredients go deep into the skin and cure it from within which I find is the best instead of doing it superficially.

NATURAL WAYS OF TREATING DARK CIRCLES:

TOMATOES & LEMON: Mix 1 teaspoon of tomato juice and 1 teaspoon of lemon juice, apply it to the under eyes and let it sit for 10-15 minutes then wash off with cold water. Tomatoes contain lycopene, which is a phytochemical that is beneficial for skin. Lycopene has also been found to protect the skin from damage. Practice this twice a day for 3 weeks for best results!

how-to-get-rid-of-pores-naturally-tomato-lemon-600x400

POTATOES: Potatoes help in brightening under the eyes so applying potato slices or potato juice directly on the affected area can help remove those dark rings. Firstly, peel and slice a raw potato into pieces then wrap them in a handkerchief or cloth and place it on your eyes for 20 minutes then wash off with warm water. If you do this regularly, you will see a reduction in your dark circles. You can soak cotton balls in potato juice and do the same, if you wish. You can also read about my other wonderful beauty benefits of potatoes here.

isolated-potatoes

MINT LEAVES: Mint leaves are rich in vitamin C, which has the efficacy to treat dark circles and improve skin health. Take a few leaves and crush them with a few drops of water till you get a paste. Apply this every night before going to bed for 10 minutes then wash off with cold water.

peppermintplant

MILK OR ROSE WATER: Soak a few cotton balls in cold milk or rose water and dab them under your eyes. Leave them on for 15-20 minutes and wash off with cold water. Do this every day on a regular basis for two and four weeks respectively to get best results. Rose water contains the lovely properties of antioxidants while milk contains lactic acid. They help smooth, rejuvenate, firm and brighten under the eyes.

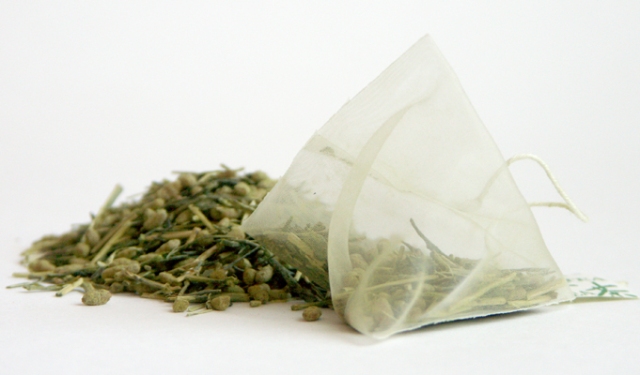
GREEN TEA BAGS: You will notice a considerable amount of improvement if you place green tea bags on your eyes every day for 15-20 minutes. Soak the tea bag in water and keep it in the fried till it is not hot. Apply the tea bags directly on your lids and then wash off. Dark circles are caused due to the dilation of blood vessels under the eyes. Green tea helps in reducing this dilation, thereby curing dark circles. It also contains tannins which have astringent properties that help constrict the blood vessels and capillaries under the eyes, and help reduce dark circles

KONICA MINOLTA DIGITAL CAMERA

This certainly turned out to be a long post but I hope you guys liked and found it useful!! 🙂

Please join my S&S family for similar posts every week! 🙂

Picture Sources: 1  2  3  4  5  6  7

5 Thoughtful Mother’s Day Gift Ideas!

mothers-day-cool-cartoon

Mothers are a strange species, wouldn’t you agree? One minute you are thoroughly pissed off at her for doing something the next minute you are giving her a bone crushing hug for something marvellous she did! We are so conflicted because we are always having mixed feelings about them! But at the end of the day when you come home and that warm smiling face is there to greet you at the door, you feel so safe and comfortable. Like all of you beautiful people, I have some very lovely memories with my mother. It was those memories of us together that didn’t allow me to move out and live on my own when college started. I guess I just wasn’t ready to go open a door and not be greeted by her face. I will be honest, my mother can be very nagging, annoying and down right interfering! That never did nor ever will stop me from running over to her first thing in the morning to see her face. No matter what they do…We can’t stop loving these women can we? 🙂

So for this mother’s day I thought I would share with you some very simple but incredibly thoughtful gift ideas which you could make or buy for you mother! 🙂

  1. POEMS: Besides her birthday, mother’s day is the best day for us to remind our mother of how much we love her. The best way, I find to be, are poems. They don’t have to be as grand and full of lovely lines like Byron’s, Keats’s or Wordsworth’s! You just need to open your heart and write what she means to you. If few lines don’t rhyme, your mother wont mind… She will be busy feeling loved at the words you wrote down to express what is in your heart. My mother personally loves it when I hand her poems wrapped in ribbons. So much so she claims that those are her best presents and that she would like more! I tell her I can’t as it is too hard for me and she gets sad but I always, ALWAYS surprise her with a poem and her face is practically priceless!
  2. LETTERS: Now if you are not comfortable or confident with your poem writing skills, fret not! Instead of poems on a paper, writer down a letter expressing your heart’s deepest love and regard for your mother. You can be as expressive writing a letter as poems. You can write down about your favourite memory of you both together or a funny incident which fills you both with peals of laughter. You can write about how grateful you are for the things she did you. There are countless numbers of things that you can put down on a piece of letter when you put your heart into it!
  3. TREASURE HUNT: You want mother’s day to be full of fun and surprises? The best way, no doubt will be a treasure hunt! All of us, regardless of our age, love treasure hunts! You can arrange that in your house or out door, whatever suits you! Each clue could contain small but useful or playful presents such as makeup products like mascaras or lipsticks. If your mother loves chocolates, you can hide various varieties of chocolates with every clue! You can be as creative as you like! Both you and your mother are going to have a blast!
  4. SPA TICKETS: Mothers work non-stop! That is bound to give them a lot of stress, anxiety and pressure. Since mother’s day is falling on a weekend, you can gift your mother tickets to a nice spa resort or an appointment. Trust me she will appreciate it very much! She works so hard throughout the week, this will be a nice, relaxing and peaceful present for her! 🙂
  5. HOMEMADE BRUNCH: Take over the kitchen for the day and prepare her favourite meals by your own hand. If you are not good at cooking, you can always ask for help or buy a cooking book. Fill the table with her favourite sweet and savoury delicacies and don’t forget to set her favourite flowers fresh from the garden or shop!

There you go guys, 5 very thoughtful gifting ideas for your mother for this mother’s day! I hope you liked and found these ideas useful, creative and convenient! 🙂

Do let me know what you all are planning on doing this mother’s day as I would very much like to know! 😀

A very happy mother’s day to all the amazing mothers out there! 😀

Join my S&S family and step into my little world! 🙂

Header Image Source

Nivea After Shave Balm As A Primer: Review

Hello beautiful people!

First of all I would like to apologize for not uploading a post on Monday. My laptop had some technical issues when it was updating itself. The update didn’t go properly and relsulted in loss of all my pictures and articles. Since they were new, I had no back up so I had to take new pictures and rewrite the article! 😦
Let’s not dwell on that for long and continue with the review! 🙂

The Review:

image

I first heard about the Nivea After Shave Balm from Kathleen Lights the YouTube beauty vlogger a few months ago and ever since then I had been very keen on trying it out. This was originally tried and tested out by Nikki Tutorials and then it spread a lot!

In case you all are not familiar with what I am talking about, Nivea After Shave Balm for Sensitive Skin has created quite a big stir among beauty gurus as one of the best PRIMER. You heard it right, primer, the product we apply on our skin before applying foundation and other makeup. It completely freaked me out!! I was shocked as to how can a men’s product be used as a primer?

However, I had to give this a try because you know me, I am all for the affordable alternatives and if such a good primer was being sold for so less, I had to get it. I wouldn’t have purchased it if I hadn’t heard Kathleen talk about it so well so I decided to give it a shot.

So I headed out with my friend got the product for INR 225. I wouldn’t have picked up the product at all if it was not ALCOHOL FREE which ensured that it would not be harsh and harmful to my skin as I was going to apply it to my face.

image

PACKAGING:

The product comes in a milky white glass bottle with dark royal blue shapes on which the writings are present and a white plastic twist on cap. The bottle is quite heavy and susceptible to breakage. The writings are quite clear and easy to understand. The mouth of the bottle is not too big which is why the flow of product is manageable.

image

TEXTURE & FRAGRANCE:

The texture of this product is milky white, thin and a bit runny which is why don’t hasten while pouring it out as you might end up pouring out way much. It also feels a little like jelly and spreads very easily. Not much of it is needed as a little goes a long way. It has a slightly strong musky fragrance which may be a turn off for most of you but I like musky fragrance so it was alright with me. The fragrance lasts on the face for some time but gradually dies down and the other makeup products mask it up.

MY TAKE ON THE PRODUCT:

image

DAY 1: I applied the product after I had moisturized my face. I used a little amount and let it sit till it dried out. I used my everyday use foundation which is Fit Me by Maybelline and it spread very easily as the main ingredient of the balm is GLYCERINE which is present in most of the face primers in the market. I properly buffed it in with my Real Techniques Buffing Brush and it gave a very natural finish. Since the climate here is very humid and hot, usually oil begins to show on my face after an hour or so but I was very surprised when it stayed on me for full 6 hours without being greasy or sticky. However, it did start becoming greasy so I had to wipe it off. I was very impressed how it made my make up stay put for so many hours in the heat.

image

DAY 2: I got the same results as day 1 but it seemed to itch a little, especially on my jaw line. I have very oily and sensitive skin.

Sadly after that, the product started to break me out. My face broke out in rashes and became a little red which is why I had to discontinue using it anymore. I will however use it again just to make sure but only after the rashes die down.

If you have sensitive skin and want to give this a try, just swatch it on a little part of your face first before applying to your whole face as you might experience some redness and rashes. If you are alright after 48 hours, continue by applying it to the whole face.

I hope you found this review useful! Have you used it and what do you think of it?
Did it break you out as well?
Do let me know about your experience with the product! 🙂

Please join the S&S family if you haven’t already and I’ll see you guys on Friday!

Much Love! 🙂

Celebrity Street Style: #1 Emma Stone

Hello beautiful people!

At the beginning of this year I told you guys that I was going to add another category in my blog; Fashion and starting today, I am doing just that! I planned that my fashion category would be based on “look books” on celebrities. I plan on calling it “Fashion Friday” and I am going to upload posts such as these every Friday as I think Fridays & Saturdays are the best days for us to unwind, relax and go through magazines or blogs on fashion & beauty. So I came up with my own mini look book fashion corner for you guys to enjoy while sipping on a cuppa tea or munching on pizzas! 😉

CSS

This is a brand new idea and this post is like a trial run for you guys to see what to expect on every Fashion Friday. If you do like this idea, I will continue doing posts such as these. Don’t forget to let me know your thoughts and opinions on my idea of Fashion Friday! 🙂

Now before we jump in and talk about fashion and celebrities, I want to tell you guys why I went with street style instead of red carpet looks. My reason for choosing street style is because that way we can relate to the clothing style even more and pick out our own choices and styles. Because we can hardly benefit from the red carpet looks, isn’t that correct?

Street style of celebrities also gives you a wonderful insight of what is currently trending in the industry which you can wear on a regular basis. My idea of doing a street style was mainly so that you all can get inspiration for everyday OOTD looks. When you see celebrities in their normal street style attire, you get inspired to venture out more into fashion and experiment with your looks.

Now let’s look at the street style by one of my favourite actress, Emma Stone:

A little bit about the actress:

Emma Stone is a 27 year old American actress who has appeared in several successful movies such as Gangster Squad, Crazy, Stupid Love, The Amazing Spiderman, Birdman and many more. Stone is one of the world’s highest-paid actresses and frequently appears on various listings of the most attractive celebrities. She has been nominated for an Academy Award, two British Academy Film Awards and two Golden Globe Awards, and has won two Screen Actors Guild Awards. In addition to her acting career, Stone supports various charities and causes, such as creating awareness on breast cancer.

The 5 outfits I chose for this Fashion Friday is perfect for the spring-summer season.

emma-stone-looks-trendy-in-overalls-andrew-garfield-12

Let’s face it, people! Dungarees are back and they are back with a bang! Almost anything can be pared with dungarees; crop tops, shirts, tank tops… You name it! Available in fabulous colours and styles, these remain timeless! I love how she pairs these dungarees with caramel coloured bag and hair. Perfect for the spring and summer season!

237AA1DD00000578-2848234-image-99_1416895026747

Over sized coats, tees, plaid skirts paired with ankle boots and bucket bag! How stylish is this dress?? It looks so comfortable but so stylish at the same time! At first I thought she was wearing a dress underneath but I looked closer and saw that it was actually a top. These items of clothing are surely available in your closets! Don’t forget the shades! 😉

article-2693402-1FA9579E00000578-913_634x827

I am so obsessed with this look by Emma Stone! This is one of my favourites. Stripped tees are so fun and quirky. I love how she paired it with a milky coffee coloured shorts. I personally am tired of seeing ripped, shredded, denim shorts. These look so much more comfortable and stylish.

emma-stone-primavera-moda-shorts-floral-pastel-entretiempo

Just like the ones above, these shorts scream summer, people! I love how it adds a pop of colour and fun to the outfit! Baggy airy tops and summer makes me feel like a feather! The way she carried that bag though. I would carry by big sling bags on one side but after seeing this, I am gonna do that!

emma-stone-style-out-in-new-york-city-july-2014_2

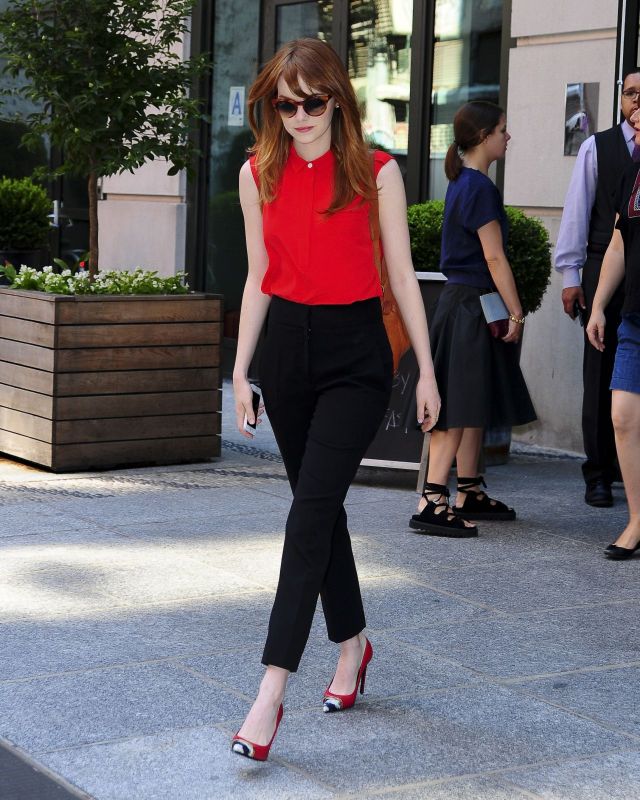
Lastly, my two facvourite colours; red and black paired together for a semi-formal look. I love how this outfit can be worn both formally and for fun! Let’s take a moment and fawn over the shoes people. I am fawning. Are you? I think that by adding the caramel coloured bag, she made this look even more perfect!

There you go guys! This was my first time writing a fashion piece so please be merciful! Do let me know if you liked my selection and which ones are your faves?

Also let me know if after reading this post you like the idea of having a Fashion Friday every week!! Do let me know! It would help me soooo much!

Have a fun filled weekend everyone and I’ll see you on Monday!

Join the S&S family! 🙂

My Top 5 Maybelline Lipsticks

DSCN1925-2

Hey Guys,

If you have been reading my blog articles for some time now, you will know that I have a major crush on Maybelline and their products. My first ever make-up items came from Maybelline and I have been hooked to them since. I think Maybelline is one of the best drugstore brand there is and their collection and range of make-up is incredible. I love the fact that I can purchase so many of their items as they are so affordable but that did not affect the quality of their products. The drugstore brands are coming out high and mighty with their spectacular launches and affordable prices. I think that is just lovely as you don’t have to spend hundred or thousands of dollars or rupees behind one product.

Now you know me… I go weak in the knees when it comes to 3 items: Eye shadows, Perfumes and obviously Lipsticks. Most of my lipsticks are from Maybelline and there are just so many colours and types to choose from. So I was going through them and picked out 5 shades I could never do without. I would definitely go back for them when they are finished.

DSCN1927-1

So let’s jump in, shall we? 🙂

No. 1- Touch of Spice:

OH. MY. GOD. The shade is just so lovely. It is a very deep terracotta with plum undertone in it. I love the fact that it is neither too purple nor too brown. I think this shade looks incredible with a brown smokey eye and is perfect for fall season. Just like the range suggests, “Color Sensational Creamy Matte”, it is truly that. The texture feels like butter on the lips but gives such a beautiful matte finish. The creamy texture of the lipstick doesn’t allow the lips to go dry. In fact it still feels creamy after several hours but looks matte. It is so pigmented, one swipe is all you need and it doesn’t tug on the lips either. Super clean and quick application. Have you tried this lipstick? 🙂

No. 2-  Nude Nuance:

This is also from the Color Sensational Creamy Matte range and the pigmentation and texture is just like Touch of Spice. However, I have to be careful while applying this as it is so soft it tends to crumble and break if I apply it with too much pressure. The shade is a slightly muted, medium-dark brown with hints of warm orange in it. It provided good coverage that went on evenly and smoothly. This shade had one of the more matte finishes and the color stayed on me for five-six hours and was neither drying nor hydrating.

DSCN1926

No. 3- Summer Sunset: The shade is a very toned down red, more of a slight red with hint of dark rose pink and a little brown with medium intensity of coppery-red in it. This is perfect for day time and is not matte. It is actually quite creamy and gives the lips a bit of a shine. Personally, I tend to stick with mattes but the shade was EXACTLY like sunset. You know when during sunset there is like several warm shades in the sky? I can pin point and tell you which one this shade is from there. It is so lovely and looks incredible during night and day.

No. 4- MAT 4: This lipstick is a bright coral red colour which is very attractive and I usually wear reds on festivities or weddings. This claims to be matte (Bold Matte as it says) but is not, it has a velvety creamy texture and appears shiny on the lips. 2 coats of this is enough to achieve to rich vibrant colour. It is very pigmented and has a decent staying power.

DSCN1931-1

No. 5: MAT 1: If you read my post, Favourite Lipsticks: Reds and Pinks then you have seen this shade there. It is an attractive neon-pink shade which immediately brightens up the face without the help of any other make-up. It is matte and can tug a little on the lips and dry it out but the colour is just so delicious! It is one of my favourite pinks and can be worn during day and night.

How many of these shades do you have?

Do let me know about your favourite Maybelline lippies! 🙂

Here are the swatches of the lipsticks:

DSCN1935-2

I hope you guys liked this post. I would love to hear about your opinions on Maybelline products and your favourite Maybelline lipsticks 🙂

Please follow if you aren’t already and I’ll see you guys soon, bye! 🙂

L’Oreal Paris Miss Manga Mascara Review

Header

Hi guys,

I’m back with another review for you and this time it’s a mascara which I am sure perked interest in many anime and manga lovers. When I saw it online and read what it was called, I knew this would end up in my collection and it did. Today I thought I would review L’Oreal Paris Miss Manga mascara in the shade Blackest Black.

For those of you who are not familiar with manga, it’s basically Japanese comic book or graphic novel which is made for children and adult entertainment.

Several of you know that I love reading manga and watching anime so it was befitting for me to purchase this mascara. When I think of manga lashes, I immediately imagine having long fluttery dense lashes but that is not possible as those are just artwork creations. Real eyelashes are very different than the manga ones. Manga lashes generally depict a baby doll looks and eyes and that is what L’Oreal attempted to do. This mascara certainly must have created quite a stir among the manga lovers and I am sure several bottles were sold. Have any of you bought this?

Examples of Manga Lashes:

source   source  source

For me this mascara gained both pros and cons.

Formula: Miss Manga is a very lightweight buildable mascara that gives lashes impressive volume and length after a few coats. It gives a very clumpy look and the more layers of the product you add, the clumpier it gets. Now I know many don’t go for the clumpy eyelash look and I am one of them but I separated them when they dried out. It also made the lashes exceptionally spidery long which can appear a little over whelming but then again, they went for the manga eyes and usually girls in the manga have super long spidery lashes. Do you go for the defined look or the clumpy eye look?

The long lashes can distract people from the eye-make but at the same time can make your eyes appear bigger and brighter. I loved the fact that it didn’t smudge after it dried out however, the mascara is wet but not watery, the best way to describe it would be creamy but slippery, which led to a messy application. The mascara felt incredible on my lashes, it was very light, almost as if I didn’t have any mascara on and very soft to touch.It came of very easily and I didn’t flake. (I have read that the mascara flaked for some people)

Brush: Tapered brush combined with a flexible joint made application messier. I personally would have preferred a stiff wand as the flexible wand made the look clumpier and it is not a good combination.

DSCN1895-1

If you have short lashes or are looking for a defined look, this is not the mascara for you as it will become very messy and application will be hard. By calling it the “Manga” mascara, you can expect nothing but clumpy and thick spiky lashes.

I think this mascara delivered what it offered to the fullest. Now if you love long spidery clumpy looks,then go for it!

Packaging: Let’s talk about the packaging for a moment. Not to sound too rude but I absolutely disliked the cardboard frame which had pictures of a girl with a big panda head and really scary eyes.

DSCN1888-1

I mean, there are several beautiful anime eyes to pick from which specifies the look and feel even more but personally, the girl on the packaging freaked me out. The bottle is a pretty one with a black body and shiny purple twist cap. It is quite sturdy and travel friendly.

BEFORE:


AFTER:

PROS: 

  • Delivers what it offers: Long spidery and thick lashes to mimic the manga ones.
  • Makes the eyes look bigger and brighter hence the “Baby Doll” look.
  • Feels very soft and light on the lashes.
  • Available in 3 shades: Black, Blackest Black and Black Brown.
  • Washes off easily. You don’t need a waterproof mascara removing wipe or soap. Your regular face wash is enough.
  • Lasted for a long time.

CONS:

  • Gives a clumpy look, which may not be your preference.
  • The spidery long look can look artificial and distracting.
  • Not a good combination of wand, made application messy.


So there you go guys,my review for the L’Oreal Miss Manga Mascara. I hope you liked it and found it useful. Have you guys used this mascara? Do let me know your thoughts on it! 🙂

Please join my little blog and I’ll shower some more new posts soon! Bye! 🙂

Top 10 High Coverage Foundations

Did you know that women in Greece used to apply chalk and white lead powder on their skin to make it fair as it was considered fashionable for women to have pale skin? Romans also used to prefer this but they used white lead paste instead. Sadly, these endeavors with lead led to the death of several Greeks and Romans. If not death, the skin was left disfigured.

Later on they started making creams using tin oxide, animal fat and starch. Men also used to apply these to make their skin tone lighter. They extracted fat from animal carcasses and colour from tin oxide which was made by heating tin metals in open air. The combination of both resulted in a coloured smooth creamy texture which was very much in demand.

Over the years, several recipes and methods have been used to create foundations however we are now in the age where we get the best products made by the best companies out there in the market today. We have several categories of foundations to pick from which will suit every skin type and colour.

Listed below is a list of the TOP 10 HIGH COVERAGE FOUNDATIONS:

  • Estee Lauder’s Double Wear: Estee Lauder provides us with high coverage a huge range of shades to pick from. The texture is liquid-y and not at all tacky. It is very pigmented and easily blendable. It is perfect for day wear as it has SPF in it which is an added bonus. The skin is left feeling luminous and it doesn’t feel heavy or oily.

000368282

  • Bourjois Healthy Mix Foundation: Along with a semi-matte finish, this foundation also gives off a very natural glow-y look. It is very easy to blend and the finish is very silky. It comes in a plastic bottle with a pump dispenser which makes it travel friendly as well. It contains fruit extracts and stay up to 6 hours.

1951881

  • Make-Up Forever High Definition Foundation: They provide a huge range of shades to pick from. The formula of this product is very pigmented, lightweight and blends very easily. 2 pumps of this is enough to get that flawless full coverage look as a little goes a long way with this foundation. It gives off a very satin, natural finish and doesn’t look tacky, at all!

hd-foundation-37810

  • M.A.C. Studio Sculpt Foundation: This foundation provides buildable coverage with the love of SPF in it. It lasts for a really long time and gives a matte finish. Oil is not visible on the skin for several hours. It blends like a dream and hides a lot of imperfections without the help of a concealer.

mac_sku_MAN701_640x600_0

  • Clinique Beyond Perfection Foundation + Concealer: The comfortable texture of this foundation doesn’t feel heavy on the skin and allows the product to be properly blended before setting into the skin. It provides a semi-matte finish, and provides buildable coverage. It is a nice choice for oily skin. It is also travel friendly.

s1674589-main-zoom

  • Revlon Colorstay Foundation: If you have dry skin or oily skin you can pick up this foundation as they come in separate category. Revlon Colorstay provides medium to heavy coverage which is perfect for special occasions when you want the full make-up look. It provides matte finish and doesn’t let oil to leak out for several hours. It is moderately priced as well.

colorstay2

  • L’Oreal Paris Infallible Lasting Perfecting Foundation: This foundation from L’Oreal provides great coverage and great staying power. It provides buildable medium to full coverage and is suitable for all skin types. It comes with a pump dispenser which controls the flow of the liquid. It provides a semi-matte finish.

62_1390812171_main

  • Covergirl Outlast Stay Fabulous 3-in-1 Foundation + Broad Spectrum SPF 20: This foundation provides a matte finish so it is suitable for oily skin. They have an extensive range of shades to pick from. The formula is pigmented and provides buildable coverage and blends easily. It also has a decent staying power and doesn’t look tacky.

CoverGirl-Outlast-Foundation

  • Lancome Teint Miracle Foundation: Since this foundation is 37% water, you can pretty much fathom how lightweight and thin this foundation from Lancome is. It provides medium to full coverage and lets you take time to buff or blend it in as it doesn’t dry off instantly. Skin doesn’t look cakey with this foundations which is why this is perfect for everyday use. It gives the skin a semi-matte natural finish making it look very hydrated and healthy. It is oil free and doesn’t clog pores.

Lancome-Teint-Miracle-Bottle

  • Neutrogena Healthy Skin Foundation: The foundation is not too creamy and not too liquidy- it is a good in-between which is just right. It provides medium to full coverage and is lightweight. It provides  luminous dewy look but not at all greasy. It also has the added protection of SPF in it. It is a bottle without a dispenser which is why you have to be extra careful while pouring it out. It also has a decent staying power of 6-8 hours.

2646137


Do let me know if you have used or are using any of the foundations listed above!

Please follow if you aren’t already and I will see you guys soon, bye!! :*

Picture Source: 1 2 3 4 5 6 7 8 9 10 11